From Nikon Learn & Explore
 The pop-up flash on many of today’s Nikon digital cameras is a wonderful feature. You no longer have to worry about having an accessory flash with you when you’re out shooting. Need a little fill flash to brighten a face on a sunny day? Can’t get the shot because there’s just not enough light? Shooting a close-up and need more light for better color or depth of field? These are instances when that pop-up flash can be a life saver. Here are some tips for getting pictures with your pop-up flash.
It’s important to remember that in photography, a good exposure depends on the right combination of ISO (sensitivity to light), shutter speed and aperture (f/stop)—and shutter speed is the one you really need to keep an eye on. If your shutter speed gets too low, you’ll get a blurry picture. But how low is too low? That depends on how good you are at holding the camera steady. As a rule, a shutter speed of 1/100 of a second or less can result in a blurry image. Using a NIKKOR VR (vibration reduction) Image Stabilization lens will help, but once you get under 1/50 of a second you need to be very careful.
Now, how does that relate to flash? If you’re in the fully automatic mode that some cameras have (the green “Auto” indicator), once the shutter speed gets low, the camera will automatically pop up the flash.
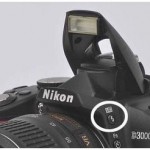
If you are shooting in any of the other shooting modes—Manual, Aperture Priority, Shutter Priority or Program—you will need to manually pop up the flash. Don’t worry, it’s really easy. Just press the Flash Mode Button—it’s usually located on the right side of the camera just below the built-in, pop-up flash itself—and the flash will automatically pop up. The trick is in recognizing that there isn’t enough light, and you will need to use your flash. Once the flash is popped up, the camera will do the rest, assuring an excellent, well-balanced exposure time after time.
It’s a good idea to stay within five to 15 feet of your subject. Remember, the pop-up flash doesn’t have as much power as an accessory Speedlight, so you’ll want to be fairly close to your subject.
If you’re taking pictures at sunset or in low light, and want to capture the ambience or mood of the scene use the Night Portrait mode that is found on some Nikon D-SLRs. It’s usually located on the top dial of the camera with the other Scene Modes. This setting allows you to take pictures with well balanced light while preserving the mood of the ambient light. This approach can result in some beautiful pictures. If your NIKKOR lens have VR Image Stabilization make sure that it is active so that you will get a blur-free picture at the slower shutter speed. If you are not using a VR lens, put your camera on a tripod for support. Night Portrait requires a little more effort, but the end result is worth it.